這個議題算是只要有留言系統,並且想實作無限層級的留言都會碰到的。
如:Facebook的留言、wordpress的留言。
當然也有簡單類的留言,只有一層的,如:古早的無名小站,但這不是我們今天要探討的。
就單刀直入了,如何實作「無限階層的留言」。
資料表
只要一張comments表加上parent_id即可,如下。
再來就可以利用程式方式(遞迴或迴圈)去印出他。

程式部分
把comments當主表,撈出資料SQL:
1 | select |
把上面資料表進行關聯後撈出後的資料:
1 | [ |
再來就可以實作程式碼了,我們要先把上面SQL撈出來的「打平結構」變成「樹狀結構」。
這會需要使用到遞迴。
1 | <!DOCTYPE html> |
轉成樹狀階層後的資料:
1 | [ |
光轉成上面那串,就想了快3小時的遞迴,然後上網找些範例參考才組出來。
我當時的疑問就是:「怎麼讓遞迴去回傳整包陣列」,所幸有找到參考,然後小改自己程式就成功了。
再來就是把上面那階層式資料在網頁上印出來。
還是要用遞迴。
網頁上內容呈現
1 | <!DOCTYPE html> |
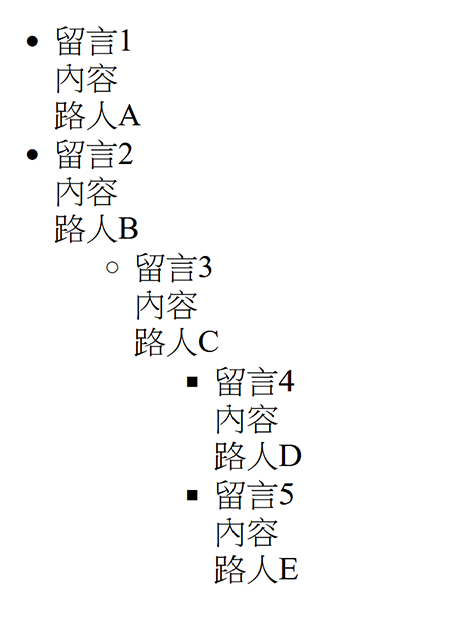
輸出結果:
總結
整篇大概花了5小時左右寫完,算是網頁系統裡最難的”遞迴”。
在網路上查,很難有一篇現成完整範例T_T,所以在這篇中就把整套都放上來。
同時練習對於樹的掌握。
流程如下:
1.規劃無限階層的留言 - 約10分鐘
2.樹的組合(遞迴) - 約3小時
3.轉譯成HTML模板(遞迴) - 約30分鐘
總之,有點成就感,因為真的不好寫。
如果後端一開始吐給你的是已經階層化的,那就很輕鬆了,因為那段的遞迴比較簡單。
ps.這留言的實作方法也能用來處理分類、類別、側邊欄,就內文改一下即可。
我有封裝了方法變成一隻.js函式庫,可以直接拿去用。
https://github.com/yuhsiang237/buildTree.js
參考資料
https://blog.51cto.com/dd118/2095671
https://kevintsengtw.blogspot.com/2013/07/aspnet-mvc-jquery-easy-ui-tree-json.html
https://ithelp.ithome.com.tw/articles/10028129
https://itw01.com/UBNZIEU.html