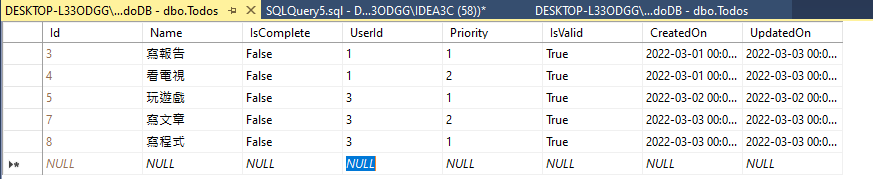
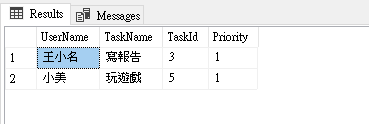
C# 同步非同步實作與介紹

前言

在這篇中簡易介紹C#同步與非同步的作法。
一般我們在做一些任務時有時需要:
1.等待上個任務完成
2.同時處理多個任務
這時就會需要用到非同步、同步的作法,可以節省時間(在同個時間內處理多個任務)。
可能用到Thead或是用Task作法asyncawait。在這篇中則以:
https://docs.microsoft.com/zh-tw/dotnet/csharp/programming-guide/concepts/async/
作為範例,簡易的操作一個需要處理同步/非同步的範例。

同步範例實作

簡單來說,就是每個任務都是會等待上面的任務完成才依序執行。
下方以製作一份早餐的同步範例,1~7步驟都要等上面的步驟完成才會繼續。

1
2
3
4
5
6
7
8
9
10
11
12
13
14
15
16
17
18
19
20
21
22
23
24
25
26
27
28
29
30
31
32
33
34
35
36
37
38
39
40
41
42
43
44
45
46
47
48
49
50
51
52
53
54
55
56
57
58
59
60
61
62
63
64
65
66
67
68
69
70
71
72
73
74
75
76
77
78
79
80
81
82
83
84
85
86
87
88
89
90
91
92
93
94
95
96
97
98
99
100
101
102
103
104
105
106
107
108
109
using System;
using System.Threading.Tasks;

namespace async
{
class Program
{
static void Main(string[] args)
{
Coffee cup = PourCoffee();
Console.WriteLine("coffee is ready");

Egg eggs = FryEggs(2);
Console.WriteLine("eggs are ready");

Bacon bacon = FryBacon(3);
Console.WriteLine("bacon is ready");

Toast toast = ToastBread(2);
ApplyButter(toast);
ApplyJam(toast);
Console.WriteLine("toast is ready");

Juice oj = PourOJ();
Console.WriteLine("oj is ready");
Console.WriteLine("Breakfast is ready!");
}

private static Juice PourOJ()
{
Console.WriteLine("Pouring orange juice");
return new Juice();
}

private static void ApplyJam(Toast toast) =>
Console.WriteLine("Putting jam on the toast");

private static void ApplyButter(Toast toast) =>
Console.WriteLine("Putting butter on the toast");

private static Toast ToastBread(int slices)
{
for (int slice = 0; slice < slices; slice++)
{
Console.WriteLine("Putting a slice of bread in the toaster");
}
Console.WriteLine("Start toasting...");
Task.Delay(3000).Wait();
Console.WriteLine("Remove toast from toaster");

return new Toast();
}

private static Bacon FryBacon(int slices)
{
Console.WriteLine($"putting {slices} slices of bacon in the pan");
Console.WriteLine("cooking first side of bacon...");
Task.Delay(3000).Wait();
for (int slice = 0; slice < slices; slice++)
{
Console.WriteLine("flipping a slice of bacon");
}
Console.WriteLine("cooking the second side of bacon...");
Task.Delay(3000).Wait();
Console.WriteLine("Put bacon on plate");

return new Bacon();
}

private static Egg FryEggs(int howMany)
{
Console.WriteLine("Warming the egg pan...");
Task.Delay(3000).Wait();
Console.WriteLine($"cracking {howMany} eggs");
Console.WriteLine("cooking the eggs ...");
Task.Delay(3000).Wait();
Console.WriteLine("Put eggs on plate");

return new Egg();
}

private static Coffee PourCoffee()
{
Console.WriteLine("Pouring coffee");
return new Coffee();
}

private class Coffee
{
}

private class Egg
{
}

private class Toast
{
}

private class Juice
{
}

private class Bacon
{

}
}
}

結果:

可以發現這樣很難節省時間,所以其實能把某些部分拆成異步來做,有助於節省時間。(雖然同時間可能記憶體耗能會加大)

異步範例實作

準備早餐程式碼的簡單非同步版本看起來像下列程式碼片段:
FryEggsAsync、FryBaconAsync、MakeToastWithButterAndJamAsync更新為Task,函式使用Async
這時會變成先做第一步,之後2、3、(4+5)步是併發執行,並使用while做判斷,依序把完成的Task移除List,仍需處理的Task數量為0就跳出,代表完成了!
再由下個任務6繼續。

1
2
3
4
5
6
7
8
9
10
11
12
13
14
15
16
17
18
19
20
21
22
23
24
25
26
27
28
29
30
31
32
33
34
35
36
37
38
39
40
41
42
43
44
45
46
47
48
49
50
51
52
53
54
55
56
57
58
59
60
61
62
63
64
65
66
67
68
69
70
71
72
73
74
75
76
77
78
79
80
81
82
83
84
85
86
87
88
89
90
91
92
93
94
95
96
97
98
99
100
101
102
103
104
105
106
107
108
109
110
111
112
113
114
115
116
117
118
119
120
121
122
123
124
125
126
127
128
129
130
131
132
133
134
135
136
137
138
139
140
141
142
143
using System;
using System.Collections.Generic;
using System.Threading.Tasks;

namespace async
{
class Program
{
static async Task Main(string[] args)
{
Coffee cup = PourCoffee();
Console.WriteLine("coffee is ready");

var eggsTask = FryEggsAsync(2);
var baconTask = FryBaconAsync(3);
var toastTask = MakeToastWithButterAndJamAsync(2);

var breakfastTasks = new List<Task> { eggsTask, baconTask, toastTask };
while (breakfastTasks.Count > 0)
{
Task finishedTask = await Task.WhenAny(breakfastTasks);
if (finishedTask == eggsTask)
{
Console.WriteLine("eggs are ready");
}
else if (finishedTask == baconTask)
{
Console.WriteLine("bacon is ready");
}
else if (finishedTask == toastTask)
{
Console.WriteLine("toast is ready");
}
breakfastTasks.Remove(finishedTask);
}

Juice oj = PourOJ();
Console.WriteLine("oj is ready");
Console.WriteLine("Breakfast is ready!");
}
static async Task<Toast> MakeToastWithButterAndJamAsync(int number)
{
var toast = await ToastBreadAsync(number);
ApplyButter(toast);
ApplyJam(toast);

return toast;
}

private static Juice PourOJ()
{
Console.WriteLine("Pouring orange juice");
return new Juice();
}

private static void ApplyJam(Toast toast) =>
Console.WriteLine("Putting jam on the toast");

private static void ApplyButter(Toast toast) =>
Console.WriteLine("Putting butter on the toast");

private static Toast ToastBread(int slices)
{
for (int slice = 0; slice < slices; slice++)
{
Console.WriteLine("Putting a slice of bread in the toaster");
}
Console.WriteLine("Start toasting...");
Task.Delay(3000).Wait();
Console.WriteLine("Remove toast from toaster");

return new Toast();
}

private static async Task<Bacon> FryBaconAsync(int slices)
{
Console.WriteLine($"putting {slices} slices of bacon in the pan");
Console.WriteLine("cooking first side of bacon...");
await Task.Delay(3000);
for (int slice = 0; slice < slices; slice++)
{
Console.WriteLine("flipping a slice of bacon");
}
Console.WriteLine("cooking the second side of bacon...");
await Task.Delay(3000);
Console.WriteLine("Put bacon on plate");

return new Bacon();
}


private static async Task<Egg> FryEggsAsync(int howMany)
{
Console.WriteLine("Warming the egg pan...");
await Task.Delay(3000);
Console.WriteLine($"cracking {howMany} eggs");
Console.WriteLine("cooking the eggs ...");
await Task.Delay(3000);
Console.WriteLine("Put eggs on plate");

return new Egg();
}

private static Coffee PourCoffee()
{
Console.WriteLine("Pouring coffee");
return new Coffee();
}
private static async Task<Toast> ToastBreadAsync(int slices)
{
for (int slice = 0; slice < slices; slice++)
{
Console.WriteLine("Putting a slice of bread in the toaster");
}
Console.WriteLine("Start toasting...");
await Task.Delay(3000);
Console.WriteLine("Remove toast from toaster");

return new Toast();
}
private class Coffee
{
}

private class Egg
{
}

private class Toast
{
}

private class Juice
{
}

private class Bacon
{

}
}
}

結果:
可以發現為異步執行!
FryEggsAsync:原本需6秒
FryBaconAsync:原本需6秒
MakeToastWithButterAndJamAsync:原本需3秒
以同步執行的話需要:15秒
在異步執行只需取其中最大的秒數:6秒
大幅度的減省時間花費。

TaskAPI 包含兩種方法, Task.WhenAll 和 Task.WhenAny 撰寫非同步程式碼,能在多個背景工作上執行非封鎖等候。
await Task.WhenAny
await Task.WhenAll
更多可參考:
https://gist.github.com/relyky/52b4abf32b44d5d00a674b9cd34ca3a3

用紅筆畫起來部分,表示其併發執行。

結論

以Async為開頭的函數內步才能夠進行併發的操作。
並且搭配可以搭配await做Task的停頓。
即讓每個可Async的Task充分利用時間。

在工作上可能遇到需要併發、可同時執行時會使用,如有N個迴圈任務且沒有順序性,則可以寫入Task,或是需要用後端呼叫HTTP請求,可以一次併發,增加系統效率。或是有順序性執行的任務就很適合採用Task拆成子項目。

如果要再深入探討可以參考官方:
https://docs.microsoft.com/zh-tw/dotnet/csharp/async

參考資料

https://docs.microsoft.com/zh-tw/dotnet/csharp/programming-guide/concepts/async/
https://gist.github.com/relyky/52b4abf32b44d5d00a674b9cd34ca3a3
https://docs.microsoft.com/zh-tw/dotnet/csharp/async

SQL Server Stored Procedure 介紹&實作

在這篇文章中簡易的介紹Stored Procedure。

Stored Procedure(預存程序)

A stored procedure is a prepared SQL code that you can save, so the code can be reused over and over again.

So if you have an SQL query that you write over and over again, save it as a stored procedure, and then just call it to execute it.

You can also pass parameters to a stored procedure, so that the stored procedure can act based on the parameter value(s) that is passed.

簡單來說就是一種預存程序,寫在資料庫裡面,可以藉由外部傳入參數去呼叫數值,而得到結果。

優點

1.能夠讓不同應用程式直接呼叫,核心邏輯不用分散。
(但目前有微服務架構能改用API了,因此除非是特別有必要,否則還是很少碰到)

缺點

1.撰寫因為沒辦法中斷點Debug所以除錯困難。

簡易寫一個Stored Procedure

1.建立一段searchProduct的Stored Procedure。用來查詢特定Id的商品。

1
2
3
4
5
CREATE PROCEDURE searchProduct 
@productId int
AS
SELECT * from Products
where Id = @productId

2.執行後可以在資料庫的「資料庫>Programmability>Stored Procedures」裡面找到

3.執行

1
exec searchProduct 6

即可得到結果:

4.這樣就完成了一段最簡單的Stored Procedure。
但在實作上主要維護時會很花時間,如果是千行T-SQL,無法使用中斷點會像是天書那樣。

總結

以目前寫過系統來說都是在後端程式裡面寫,而Stored Procedure算是一個新的體驗。
除非,真的有必要需求,否則還是用API式輕量化,因為比較好DEBUG。

SQL Server 常見SQL語法筆記

前言

在這裡整理一些專案常用的SQL語法。

語法

1.新增一筆資料

1
insert into Todos (Name) Values ('123')

2.更新一筆資料

1
update Todos set Name = '4123',IsComplete = 1 where Name = '123'

3.刪除一筆資料

1
delete from Todos where id = 17

4.查詢該表所有資料

1
select * from Todos;

5.使用查詢結果新增資料

1
insert into Todos (Name) select Name from Todos where Name = '4123'

6.INNER JOIN 主表跟次要表都有相同的值才撈出

1
2
select * from ShipmentOrderDetails as a 
join Products as b on a.ProductId = b.Id

7.LEFT JOIN 主表值為主嘗試撈取次要表值,次要表有值就撈,沒值就NULL

1
2
select * from ShipmentOrderDetails as a 
left join Products as b on a.ProductId = b.Id

8.GROUP BY 取得以哪個欄位作為群,並且操作該群的集合資料

1
2
select OrderId,sum(ProductPrice * ProductUnit) sum from ShipmentOrderDetails 
group by OrderId

9.多對多資料處理(即使用left join/join的組合技)

1
2
3
select a.Id,a.Name,c.Id as ProductCategoryId,c.Name as ProductCategoryName from Products as a
left join ProductProductCategoryRelationships as b on a.Id = b.ProductId
left join ProductCategory as c on c.Id = b.ProductCategoryId

總結

這裡整理SQL常見用法。
因為在寫C#時其實內部會使用LINQ,所以就會對不常用的原生SQL生疏,因此在此整理在專案上常見的使用方法,有需要時就能節省再熟悉的時間。

[Day30] C# MVC 實際撰寫後之我的想法 - C#&AspNetCore

在此先說明一下,大概花了一個月製作了了一套商品出貨訂單系統的Side Project。
儲存庫:https://github.com/yuhsiang237/Order-System
影片網址:https://www.youtube.com/watch?v=nSk6OZjhDMY

所以這文章內容會包含很多我與之前的製作系統經驗的分享。

首先,MVC現在已經算是很主流的網站架構了,我在之前有使用過Laravel、ASP.NET Core MVC這兩套框架來設計系統,因此在整體的觀感上因為設計模式是有共同的出發點,所以上手難度是差不多,甚至說是無痛換上的感覺。因此,依照這個推論,如果仍有下個世代的框架出來,也是標榜MVC那也夠無痛接手,頂多就是學一些基礎語法糖而已。

而專案內通常有少部分會寫到演算法,我目前處理過最複雜演算法就是BFS,主要是要產生訂單的子代、父代,並且將畫圖產生出來,就是一張圖論的圖。這算是我在專案裡面處理過最複雜的結構。
這是我的演算法筆記用的存庫,遇到一些算法需求會整理上去。
https://github.com/yuhsiang237/AlgorithmStudy

而MVC基本上跟演算法無關。他只是給你一套共同認知的地基,讓你能夠跟其他人有共同基礎去打造事物,這有什麼好處呢?能夠增加維護性,因為在沒基礎下,需要知道整體脈絡怎麼寫必須去翻舊的程式碼,算是一部分技術債,而MVC則把這技術債降低,讓你能夠比較無痛的降低學習成本,有點像是一套彼此知道的內功,學會就能打天下。

再來我說說Laravel與ASP.NET Core MVC的差異。

在除錯上,C#有著地表最強IDE Visual Studio撐腰,所以除錯非常容易,只要中斷點下去跑一次八成就知道要改哪裡了。Laravel則需要肉眼DEBUG,或是自己插Return返回點。

在撰寫速度上,C#需要編譯時間,Laravel是直譯語言則不需要所以會快一些。但如果考量到C#便利的中斷點,那最後把時間拉長我認為是C#會是優勝。

在型別上,C#屬於強型別,每屬性有特定的類型,能夠讓自己很清楚知道要塞什麼數值。而Laravel則是弱型別,宣告是用$var所以大專案下來可能會不知道哪個是哪個變數,可能會造成數值塞錯報錯。

在直譯與編譯上,C#需要編譯才能知道撰寫成功與否,Laravel則是要當場跑才知道。如果C#可以成功編譯,那可能上線只會有邏輯錯誤;Laravel則是需要當場去試錯才比較可能知道問題。

在開發速度上,C# MVC有一套框架給你但並不給你便利的內建系統,如Seed塞值、資料庫遷移、內建Redius、等等。而Laravel則是全都給你了,所以你就只要寫邏輯就好。

在版本升級上,C# MVC基礎就View Model Controller所以升級版本只要考量套件問題,相容就沒問題,而現在ASP.NET Core仍然是用基礎寫法寫就能無痛升級。Laravel則是要考量目錄變動,因為它幫你內建很多功能,每個版本的寫法也不太相同。

在資料結構上,C#內建超多的資料結構,如List、Array、Directory、Hashset…幾乎是C++的STL演算法有的他都全包還擴增,而Laravel則是沒有,需要自己找套件包或自己寫,在處理複雜資料時就會稍微辛苦一點。

在其他領域應用上,C#能夠開發網頁、桌面程式、library、windows、linux(asp.net core)。而Laravel則是只能開發網頁。

總結

這是我對於這兩套MVC的差異理解,但總體來說還是看自己需求,以目前來看未來我會選擇C# MVC,因為在維護上方便許多、在台灣工作環境相對友善(?)。而更重要的是需求分析、設計模式、演算法方面,因此目前可能會往這邊走XD。
總之,哪種方法能夠讓我花最少成本大概就是它了,畢竟寫程式某種意義就是避免浪費時間。

[Day29] C# MVC 被使用在哪些地方 - C#&AspNetCore

先以C#語言實際用在那些地方開始講好了,可以製作遊戲Unity、命令列程式、跨平台(ASP.NET Core)、手機(但很少)、桌面應用、資料分析。唯一缺點大概就是嵌入式,因為通常嵌入式有記憶體限制,會壓的很低,會用純C,但是C#基本上語法跟C也很相像。

而ASP.NET的MVC則是在處理網頁為多數,如現在普遍在台灣看到的政府機構網頁、大型服務網頁都可以用這套MVC去實現,算是處理大量資料已經有認證過可以實踐的框架了。

簡言之,就是沒什麼框架能與之抗衡,光是Visual Studio的除錯能力就能減少很多開發者的時間。以及背後的支持微軟,是自己家目前產品。而Linux則是偏向雜湊派,東加西加拼湊,整合度比較低。因此,目前首選還是微軟。

結論

總而言之,除了嵌入式、手機外,一些後端API、網頁程式基本上都可以看到它的蹤影。

[Day28] C# MVC FluentValidation 好用的驗證格式套件 - C#&AspNetCore

這回介紹一個必用的驗證神器FluentValidation,在處理驗證時會比原本Model驗證好上很多。因為他能適應不同的條件變化。

首先先看一張DEMO圖,就是類似表單驗證什麼都可以使用。

安裝

1.開啟NuGet管理畫面

2.因為我是.net core專案所以安裝FluentValidation.AspNetCore,如果不是就裝第一個

撰寫一個簡單驗證

在此以帳密登入為範例

1.先建立一個Model
Models/LoginViewModel.cs

1
2
3
4
5
6
7
8
9
10
11
12
13
using System;
using System.Collections.Generic;
using System.Linq;
using System.Threading.Tasks;

namespace FluentValidationExample.Models
{
public class LoginViewModel
{
public string Account { get; set; }
public string Password { get; set; }
}
}

2.撰寫該Model驗證
Models/Validator/LoginViewModel.cs

1
2
3
4
5
6
7
8
9
10
11
12
13
14
15
16
17
18
19
20
21
22
23
24
using System;
using System.Collections.Generic;
using System.Linq;
using System.Threading.Tasks;
using FluentValidation;

namespace FluentValidationExample.Models.Validator
{
public class LoginValidator : AbstractValidator<LoginViewModel>
{
public LoginValidator()
{
RuleFor(x => x.Account).NotNull().WithMessage("名稱不可為空");
RuleFor(x => x).Custom((x, c) =>
{
if (x.Password == "" || x.Password == null)
{
c.AddFailure("Password", "密碼不可為空");
}
});
}

}
}

最主要是繼承抽象的AbstractValidator,而裡面傳進去的多型是LoginViewModel,即要驗證的Model。
再來就是用RuleFor去驗證。
我寫了一個內建、一個客製的。
此外,如果有連結資料庫也能從外面把Context傳進來。

3.再來撰寫登入的Post事件
Controllers/HomeController.cs

1
2
3
4
5
6
7
8
9
10
11
12
13
14
[HttpPost]
public IActionResult Index(LoginViewModel model)
{
LoginValidator validator = new LoginValidator();
ValidationResult result = validator.Validate(model);
if (!result.IsValid)
{
foreach (ValidationFailure failer in result.Errors)
{
ModelState.AddModelError(failer.PropertyName, failer.ErrorMessage);
}
}
return View();
}

基本上就是套用剛剛完成的validator。
當!result.IsValid時將錯誤訊息塞給ModelState,在前台就能顯示。

4.前台畫面cshtml撰寫。

1
2
3
4
5
6
7
8
9
10
11
12
13
14
15
@model FluentValidationExample.Models.LoginViewModel;

<div class="text-center">
<h1 class="display-4">Welcome</h1>
<p>Learn about <a href="https://docs.microsoft.com/aspnet/core">building Web apps with ASP.NET Core</a>.</p>
</div>
<div asp-validation-summary="ModelOnly"></div>

<form asp-action="Index">
Account <input asp-for="Account" /> <span asp-validation-for="Account"></span>
<br />
Password <input asp-for="Password" /> <span asp-validation-for="Password"></span>
<br />
<input type="submit" value="submtit" />
</form>

主要就塞入asp-validation-for,他會與ModelState匹配,剛剛增加的錯誤訊息就能收到並顯示在畫面上了。

6.完成,然後嘗試用Debug跑一次

總結

為什麼不用Model驗證呢?
因為不同情況如某些時候欄位必填,有時不是,這時就會有問題。
而FluentValidation則完整破除這問題,並且能以邏輯方式條列撰寫,在釐清數據正確與否非常有幫助。
因此建議還再使用Model驗證的人可以快點換成FluentValidation,複雜的條件也能迎刃而解。

在此附上專案連結:
https://github.com/yuhsiang237/FluentValidation-Project

更多範例可以參考官方:
https://docs.fluentvalidation.net/en/latest/aspnet.html

[Day27] C# MVC 回傳獨立頁面或整體頁面 - C#&AspNetCore

在此介紹如何讓某些頁面不套用原本預設的_Layout.cshtml。

如常見的登入頁面,常常是一個獨立畫面,這時只要回傳PartialView。
UserController.cs

1
2
3
4
public IActionResult SignIn()
{
return PartialView();
}

而預設會套用_Layout.cshtml的則是回傳View。
HomeController.cs

1
2
3
4
public IActionResult Hone()
{
return View();
}

結論

簡單介紹一下,此外如果要控制預設吃什麼Layout可以從以下檔案設定:

1
\Views\_ViewStart.cshtml

[Day26] C# MVC LINQ實作常見用法 - C#&AspNetCore

在這篇中主要紀錄一些常見的C# LINQ寫法,通常搭配資料庫EF Core使用。

1.簡單取得匹配某ID的”複數”筆資料列

1
2
3
4
var query = 
from a in _context.Roles
where a.Id == user.RoleId
select a;

2.取得某”單筆”物件資料

作法1:

1
2
3
4
5
6
7
8
9
10
var query = (from a in _context.Users
where a.Account == userAccount
select new
{
Id = a.Id,
Account = a.Account,
RoleId = a.RoleId,
Name = a.Name,
Email = a.Email
}).FirstOrDefault()

作法2:

1
var query =  _context.Products.FirstOrDefault(x => x.Id == shipmentOrderDetail.ProductId);

差別在一個全是用.的方式寫。

3.群組資料結果。此例將日期變成群組,統計每日期具有的資料筆數。
且使用匿名class建立搜尋結果。

1
2
3
4
5
var query = from a in _context.ShipmentOrders
where a.IsDeleted != true
where a.DeliveryDate.Value.Month == DateTime.Now.Month
group a by a.DeliveryDate.Value.Date into g
select new { DeliveryDate = g.Key, Count = g.Count() }

4.主表a之後inner join b表的資料。

1
2
3
4
5
6
7
8
9
10
11
12
var query = from a in _context.ReturnShipmentOrders
join b in _context.ShipmentOrders
on a.ShipmentOrderId equals b.Id
where a.IsDeleted != true
select new ReturnShipmentOrderViewModel
{
Id = a.Id,
Number = a.Number,
ShipmentOrderNumber = b.Number,
Total = a.Total,
ReturnDate = a.ReturnDate
};

5.LINQ子查詢,Category表資料在另一個多對多表上,使用子查詢去取得結果。

1
2
3
4
5
6
7
8
9
10
11
12
13
14
15
16
17
18
19
20
var query = from a in _context.Products
where a.IsDeleted != true
select new ProductIndexViewModel
{
Id = a.Id,
Number = a.Number,
Name = a.Name,
CurrentUnit = a.CurrentUnit,
Price = a.Price,
Description = a.Description,
Category = (from b in _context.ProductProductCategoryRelationships
join c in category
on b.ProductCategoryId equals c.Id
where b.ProductId == a.Id
select new ProductCategory
{
Id = c.Id,
Name = c.Name
}).ToList()
};

6.取得總數統計,在此例以取得某年的Total加總。

1
2
3
4
var query = (from a in _context.ShipmentOrders
where a.IsDeleted != true
where a.FinishDate.Value.Year == DateTime.Now.Year
select a.Total).Sum()

7.取得查詢的結果數量

1
2
3
var query = (int)(from a in _context.Products
where a.IsDeleted != true
select a.Id).Count();

結論

主要在這篇中紀錄實作常見會寫到的作法。
此外,如果熟悉LINQ後反而會造成原生SQL語法淡忘,所以還是要加減注意一下原生作法。

Arduino LED與Button控制

前言

想以僅有的材料做個LED與按鈕控制實驗。
並且藉由撰寫程式來監控按鈕,並控制LED明暗。

材料

  1. LED 3MM 紅色 x 1 :發光二極體 (1.8V~2.2V,5mA~20mA)
  2. Arduino版 x 1:任意一塊都可 (UNO)
  3. 220歐姆電阻(5%) x 1:紅紅棕金
  4. 2.2k歐姆電阻(5%) x 5:紅紅紅金

首先是LED的線路,要讓LED能夠穩定且不燒壞的亮燈,要先計算電阻多少。
OUTPUT會給予5V,因此用歐姆定律

1
V = IR

(5-2)=0.02R
R=150ohm

但是LED其實可以低於20mA,規格是5mA~20mA
因此嘗試串聯一顆220歐姆電阻算看看:
(5-2)=I*220
I=3/220
=0.013A
=13mA
還在範圍內!所以就用220歐姆電阻了!

再來是按鈕部分,這時要扯到一個新概念就是上拉電阻
上拉電阻:
在數位電路中,上拉電阻(英語:Pull-up resistors)是當某輸入埠未連接設備或處於高阻抗的情況下,一種用於保證輸入訊號為預期邏輯電平的電阻元件。他們通常在不同的邏輯裝置之間工作,提供一定的電壓訊號。

主要用上拉電阻協助我們按鈕提供穩定的訊號。

當開關斷開的時候,邏輯閘的輸入訊號被上拉到Vin;當開關閉合的時候,邏輯閘的輸入端與地面相連,輸入訊號接近0伏特。

通常上拉電阻都會接10K電阻,但我手邊只有2.2k所以串個5顆。

V=IR
5 = I*(2200*5)
I=0.0004A=0.4mA

Code.ino

1
2
3
4
5
6
7
8
9
10
11
12
13
14
15
16
17
18
19
20
21
22
const int BUTTON_PIN = 7;  // 按鍵的接腳
const int LED_PIN = 8; // LED燈的接腳

int buttonState = 0; // 按鈕的狀態

void setup() {
Serial.begin(115200);
pinMode(LED_PIN, OUTPUT); //設定LED的PIN腳為輸出
pinMode(BUTTON_PIN, INPUT); //設定按鈕的接腳為輸入,因為我們要讀取它的狀態
}

void loop() {
buttonState = digitalRead(BUTTON_PIN); //讀取按鍵的狀態

if(buttonState == LOW){ //如果按鍵按了
Serial.print(buttonState);
digitalWrite(LED_PIN, HIGH); //LED就亮了
}else{ //如果按鍵是未按下
Serial.print(buttonState);
digitalWrite(LED_PIN, LOW); //LED就不亮
}
}

總結

發現電路需要理論部分的加強,否則接出來的線路會有問題。
以此來說就是上拉電阻,如果不知道他的原理,會覺得接個5V出來是要做什麼。

參考資料
https://zh.wikipedia.org/wiki/%E4%B8%8A%E6%8B%89%E7%94%B5%E9%98%BB

[Day25] C# MVC API JWT Token驗證 (下) JWT實作 - C#&AspNetCore

在這篇中主要實作JWT的登入認證,取得Token、透過Token對有權限的API進行存取。

安裝

1.先安裝JWT套件,因為我是用AspNetCore所以用
Microsoft.AspNetCore.Authentication.JwtBearer

撰寫

1.撰寫產生JWT Token的程式碼。
TokenController.cs

1
2
3
4
5
6
7
8
9
10
11
12
13
14
15
16
17
18
19
20
21
22
23
24
25
26
27
28
29
[HttpPost("GenerateToken")]
[AllowAnonymous]
public ActionResult<string> GenerateToken()
{
string issuer = "JwtAuthDemo";
string signKey = "ASASA1@AAASASASASA1@AAASAS"; // 需要大於16字元
string Account = "TestAccount";

var securityKey = new SymmetricSecurityKey(Encoding.UTF8.GetBytes(signKey));
var signingCredentials = new SigningCredentials(securityKey, SecurityAlgorithms.HmacSha256Signature);

// 建立 SecurityTokenDescriptor
var tokenDescriptor = new SecurityTokenDescriptor
{
Issuer = issuer,
Subject = new ClaimsIdentity(new[]
{
new Claim(JwtRegisteredClaimNames.Sub, Account), // User.Identity.Name
new Claim(JwtRegisteredClaimNames.Jti, Guid.NewGuid().ToString()), // JWT ID
new Claim("test", "123") // 可加入自訂內容在聲明裡
}),
Expires = DateTime.Now.AddMinutes(60),
SigningCredentials = signingCredentials
};
var tokenHandler = new JwtSecurityTokenHandler();
var securityToken = tokenHandler.CreateToken(tokenDescriptor);
var serializeToken = tokenHandler.WriteToken(securityToken);
return serializeToken;
}

2.撰寫測試JWT請求的程式碼
在此撰寫兩個一個是取得所有聲明,一個是取得該Token得獨立識別值。
TokenController.cs

1
2
3
4
5
6
7
8
9
10
11
12
13
14
[Authorize]
[HttpGet("GetClaims")]
public IActionResult GetClaims()
{
return Ok(User.Claims.Select(p => new { p.Type, p.Value }));
}

[Authorize]
[HttpGet("GetTokenID")]
public IActionResult GetTokenID()
{
var jti = User.Claims.FirstOrDefault(p => p.Type == "jti");//每個token的識別值,如果要禁用某token就可以把識別值存到資料庫當黑名單
return Ok(jti.Value);
}

3.增加服務
Startup.cs

1
2
3
4
5
6
7
8
9
10
11
12
13
14
15
16
17
18
19
20
21
22
23
24
25
26
27
28
29
30
31
32
33
public void ConfigureServices(IServiceCollection services){


services
.AddAuthentication(JwtBearerDefaults.AuthenticationScheme)
.AddJwtBearer(options =>
{
// 當驗證失敗時,回應標頭會包含 WWW-Authenticate 標頭,這裡會顯示失敗的詳細錯誤原因
options.IncludeErrorDetails = true; // 預設值為 true,有時會特別關閉

options.TokenValidationParameters = new TokenValidationParameters
{

// 一般我們都會驗證 Issuer
ValidateIssuer = true,
ValidIssuer = "JwtAuthDemo",

// 通常不太需要驗證 Audience
ValidateAudience = false,
//ValidAudience = "JwtAuthDemo", // 不驗證就不需要填寫

// 一般我們都會驗證 Token 的有效期間
ValidateLifetime = true,

// 如果 Token 中包含 key 才需要驗證,一般都只有簽章而已
ValidateIssuerSigningKey = false,

// JWT簽證密要,之後可自行設定在appsettings.json
IssuerSigningKey = new SymmetricSecurityKey(Encoding.UTF8.GetBytes("ASASA1@AAASASASASA1@AAASAS"))
};
});

}

4.添加授權

1
2
3
4
5
6
public void Configure(IApplicationBuilder app, IWebHostEnvironment env, IApiVersionDescriptionProvider provider)
{
app.UseAuthentication();
app.UseAuthorization();

}

5.完成測試結果:
取得Token

用剛剛產生的JWT Token取得聲明

用剛剛產生的JWT Token取得Token識別值

總結

C#在處理JWT上算是蠻簡潔的,不用寫太多行,主要複雜點就在Startup.cs增加服務、產生Token這兩個步驟。
專案存庫位置:https://github.com/yuhsiang237/ASP.NET-Core-RESTfulAPI-JWT

然後附上DEMO影片一個是用Postman測試,一個是程式碼跑起的時的Swagger
swagger demo:

postman demo: